1977 R100Si BMW Cafe Racer Oshmo and Gold Country Cafe Racers Colaboration
1977 R100Si BMW Cafe Racer
OSHMO and Gold Country Cafe Racers Collaboration
Here’s the tear-down and build of our latest project, Der Knight Stalker. –
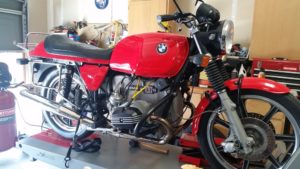
I decided to build another cafe bike after I had recently completed an R100/7 into a featured, front cover bike for the BMW RA magazine, OTL. The teardown process begins on an R100S which I purchased with a bad transmission, as a result, it was a real bargain. It already had a lousy re-spray but was fitted with some really nice accessories. It even came with a Staintune stainless exhaust system which I sold with the Krauser luggage along with some of the other parts which covered the cost of the bike itself. I also was fortunate to find a really good fabricator, Artie Cathcart, owner of TCB Fabrication in Chico, CA. Coincidently, he was given a 1990 BMW R100 mono lever. He didn’t want the front-end or the rear-end, so I purchased it to build a matching numbers 100S with a mono lever suspension.
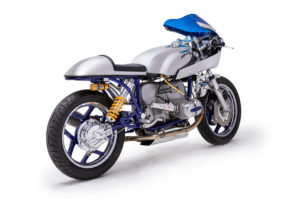
I found some aluminum body parts online for sale in AZ, that I thought would make for a good bike build. Given the cost of these parts, I wanted the bike to be noteworthy, not just a /6 or /7 build. Not that there’s anything wrong with those. I was in search of something a bit more desirable. Fortunately, I was able to find an R100S for sale locally. I really think this build will look great with a cobalt blue frame and wheels to compliment the polished aluminum pieces. In the photo below you see where I painted an outline where I was going to customize the foot peg bracket by cutting them out, well that was until I saw the wings that OSHMO fabricated while visiting the shop. I ended up with a pair of these wings, their rear-sets, upper triple clamp and other bits for the build.
As you can see the tunnel of the tank was definitely built for a wider frame, I believe it was for a Honda CB 750. My enthusiasm got the best of me when I came across these parts online. Regrettably, I didn’t ask all the right questions, I didn’t know enough as to which questions to ask when it came to the aftermarket aluminum parts. The person selling these had it pictured propped up on a /6, making it look like it would be a direct bolt on kit with just a few mods. He was less than forthcoming with his information.
My fabricator, started by filling in the huge gaps fore and aft. This is welded inside and out so when it comes to blending it all together by grinding/filing away the weld for polishing later, it will still have strength and integrity on the inside.
The Toaster Tan top clamp will be switched out with OSHMO’s triple clamp that accepts the Moto Gadget speedo.
Artie then went to work on the rebuilding the underside of the tank to give it more volume for fuel and also to copy the stock BMW frame mounts.
Checking in on the progress over the weekend it looks like the tank is coming along. As you can see quite a bit of the gap has been filled in. As a result, I gained more fuel capacity, and we got the traditional BMW frame mounts configured on the tank. Just a little tweaking on fitment and then polishing after the fuel taps are added to accept stock BMW petcocks.
Here the installation of OSHMO Wings has taken place. These expertly crafted wings, with the specially fabricated spacer bar provided by OSHMO, has really made a difference in the look of this build. I’ve always despised the look of the stock foot peg supports when you switch to rear sets, it just doesn’t look right. These “wings,” as Osh calls them look much better.
Here’s a closeup before cleanup. As you can see these are much better looking than the stock foot peg supports on the airhead frame. One of the nice touches to the OSHMO Wings is the addition of this steel mesh panel that I dreamed up. Artie took the lead and cut out the pieces and attached them. They’ll either be polished out to contrast against the cobalt blue frame, or powder coated black. If you’re wondering why I’m calling this the Knight Stalker, it’s because the bike with its polished aluminum bits, and the mesh metal, and cobalt blue frame is reminiscent of Sir Galahad, the greatest Knight ever. OK, it’s my fantasy, my bike too. 😉
Today, the fabrication of the new sub-frame took place. As you can see this 77 R100S was converted to a Monoshock design. People have asked why didn’t I start with a Monoshock frame? The answer is because I have a matching numbers R100S frame and engine that I wanted to keep together. I had a unique opportunity to grab the rear and front ends of a 1990 R100 and modify this ’77. This will have a better handling rear end to compliment better forks and Brembo brakes up front.
Because of the mono shock design, special consideration had to take place in the design of the sub-frame. I wanted a sub-frame with a curved shape to compliment the curves of the wings, and the OSHMO Rear Sets, the curves of the tank and fairing. I think Artie did really well making it all look stock.
Here you can see the battery box and Moto Gadget M-Unit box tray. It will also have a forward tray for the tool roll. As you can see a rear fender/mud guard has been added. You couldn’t see it in the previous photo because he did a good job blending it in with the curve of the sub-frame. Well done Artie!
Soon he’ll be wrapping this up and moving to the front fender and fairing modifications. I’m getting kind of anxious as it seems like I’m running out of time to get it done in time for the Quail Motorcycle Gathering in Carmel on May 14th. I still have to reassemble the whole bike before I take it in for powder coat to make sure everything is as I want it.
A new custom fender had to be designed for the Knight Stalker to match the rest of the aluminum pieces. Artie banged this out and made it look like it belongs on this bike.
The front fairing came with a universal frame for mounting. It really was hokey, so Artie modified it for better stability and fitment. The overall fit looks fantastic
. Time to drop the motor back in the frame and design a new stainless exhaust system.
 Time to fit the Akropovic Muffler.
 Work begins on the custom Belly Pan…
 as well as the aluminum oil cooler shroud. All pieces that will be polished on the bike.
It’s time to tear down the bike to the frame and send off parts off to powder coating and to the polisher
After receiving parts back assembly begins.

